Are you looking to boost your WooCommerce store’s sales while providing your customers with a payment option that’s as convenient as it is popular? Look no further! Adding Afterpay to your WooCommerce site could be the game-changer you’ve been waiting for. This flexible payment method allows customers to split their purchases into manageable installments—making it easier for them to say “yes” to that must-have item in their cart. In this article, we’ll walk you through the easy steps to integrate Afterpay into your WooCommerce store, helping you enhance the shopping experience, increase your conversion rates, and ultimately, elevate your business to new heights. So, let’s dive in and discover how you can offer your customers the convenience they crave while driving sales like never before!
Understanding Afterpay and Its Benefits for Your Online Store
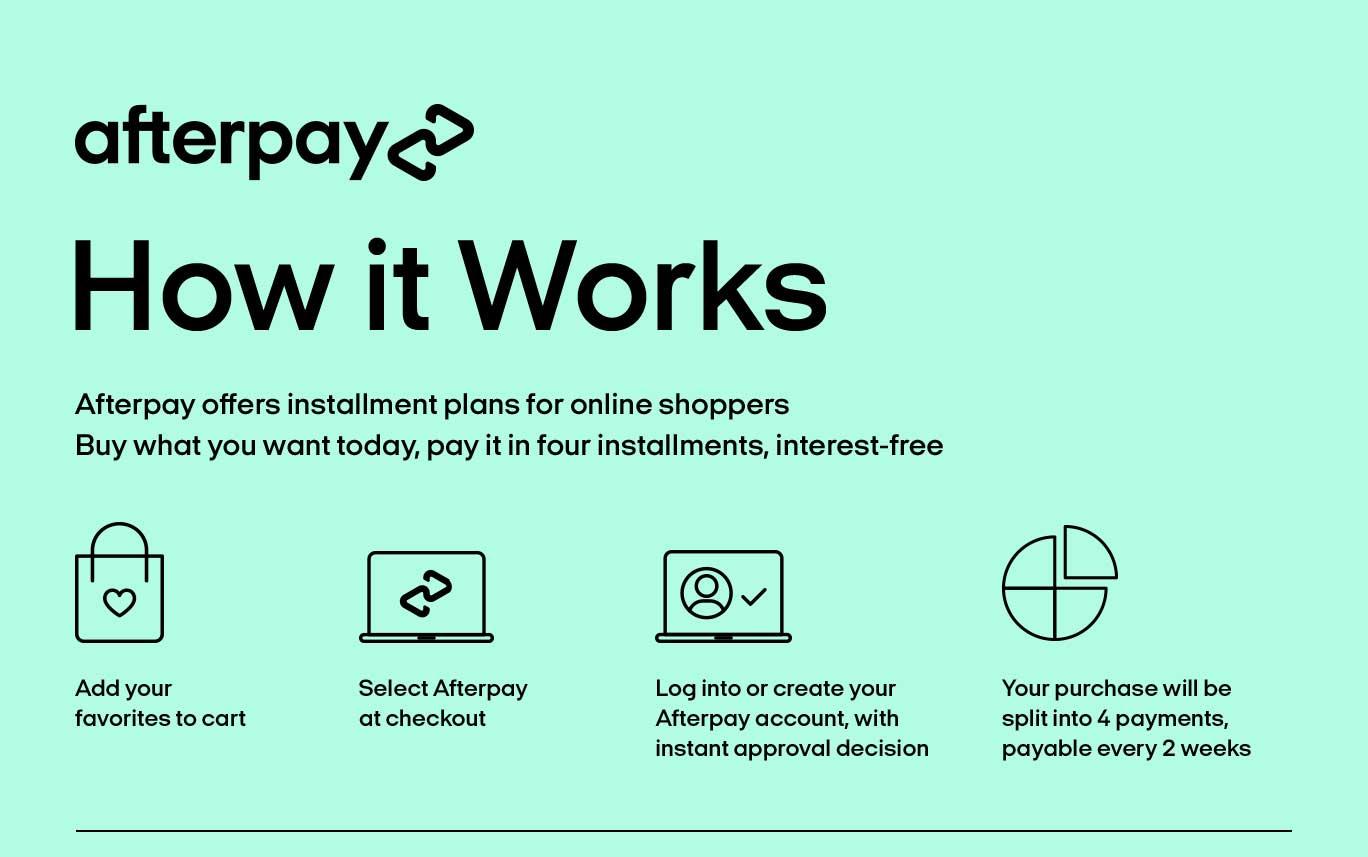
Afterpay has revolutionized the way consumers engage with online shopping by offering a flexible payment solution that caters to modern spending habits. Integrating Afterpay into your WooCommerce store not only enhances the customer experience but also drives sales and increases average order values. This service allows customers to split their purchases into four interest-free payments, making higher-priced items more accessible.
Here are some key benefits of adding Afterpay to your online store:
- Increased Conversion Rates: By offering a payment option that allows customers to manage their budgets more effectively, you reduce cart abandonment rates and encourage impulse purchases.
- Attracting a Younger Audience: With Afterpay, you tap into the millennial and Gen Z markets, who prefer payment solutions that offer flexibility and convenience.
- Boosting Average Order Value: Customers are often willing to spend more when they can pay in installments, leading to higher sales per transaction.
- No Risk for Merchants: Afterpay assumes the risk of customer payments. You receive full payment upfront, while Afterpay takes care of the customer’s installment plan.
Integrating Afterpay into your WooCommerce platform is straightforward. Once activated, it seamlessly integrates into your checkout process, providing customers with a familiar and user-friendly interface. You can easily manage your Afterpay transactions through the WooCommerce dashboard, allowing you to focus on growing your business rather than handling complex payment issues.
To give you a clearer picture, here’s a simple comparison of Afterpay versus traditional payment methods:
| Feature | Afterpay | Traditional Payment |
|---|---|---|
| Payment Flexibility | 4 interest-free installments | Full payment upfront |
| Risk to Merchant | None | High (chargebacks, fraud) |
| Target Audience | Millennials & Gen Z | General audience |
| Setup Complexity | Easy integration | Varies by provider |
By adopting Afterpay, you’re not just adding a payment option; you’re enhancing the overall shopping experience, catering to a demographic that values flexibility, and ultimately driving your store’s growth. Don’t miss the chance to transform your WooCommerce store into a more appealing shopping destination that meets the needs of today’s consumers.
Getting Started with WooCommerce: A Quick Overview
Integrating Afterpay into your WooCommerce store can elevate your business by providing customers with flexible payment options. With Afterpay, your customers can shop now and pay later, which not only enhances their shopping experience but can also increase your store’s conversion rates. Here’s a straightforward guide to get you started.
First things first, you’ll need to ensure you have a WooCommerce store set up. If you haven’t done that yet, you can easily install WooCommerce through your WordPress dashboard. Just navigate to Plugins > Add New, search for WooCommerce, and hit Install Now. Once activated, follow the setup wizard to configure your store settings.
Once your WooCommerce store is up and running, the next step is to install the Afterpay plugin. You can find this plugin in the WordPress plugin repository. Here’s how to do it:
- Go to Plugins > Add New in your WordPress dashboard.
- Search for “Afterpay for WooCommerce”.
- Click on Install Now, then activate the plugin once it’s installed.
Now that the Afterpay plugin is activated, you’ll need to configure it. Navigate to WooCommerce > Settings and click on the Payments tab. Here, you’ll see Afterpay listed as a payment option. Click on it to configure settings such as:
- Afterpay account credentials
- Payment method title
- Display options on checkout
After configuring the settings, ensure that you test the Afterpay payment option thoroughly. You can do this by placing a test order on your store to see how the payment process works from a customer’s perspective. Remember, a seamless checkout experience is essential for maximizing sales.
| Step | Description |
|---|---|
| Install Plugin | Search for the Afterpay plugin in your dashboard and install it. |
| Activate Plugin | Ensure the Afterpay plugin is activated in your plugins list. |
| Configure Settings | Input your Afterpay credentials and adjust payment settings. |
| Test Checkout | Place a test order to verify the Afterpay payment process. |
Adding Afterpay to your WooCommerce store is a straightforward process that can significantly benefit your business. By offering customers more payment flexibility, you can enhance customer satisfaction and potentially boost your sales. So, why wait? Get Afterpay up and running today!
Setting Up Your WooCommerce Environment for Afterpay Integration
To successfully integrate Afterpay with your WooCommerce store, you first need to ensure that your environment is fully prepared. This involves a few essential steps to set up your site for seamless transactions and to provide a fantastic shopping experience for your customers.
Start by confirming that your WooCommerce installation is up to date. An outdated version may cause compatibility issues with Afterpay’s payment gateway. Here’s how you can check:
- Log in to your WordPress dashboard.
- Navigate to Dashboard > Updates.
- If there are updates available for WooCommerce, go ahead and update.
Next, ensure that your theme supports WooCommerce features. Most modern themes do, but it’s worth checking. You can do this by:
- Going to Appearance > Themes.
- Selecting your active theme and reviewing its details.
- Looking for compatibility tags or WooCommerce support in the theme description.
After confirming that your theme is compatible, it’s time to install the Afterpay plugin:
Go to Plugins > Add New in your dashboard.
Search for "Afterpay for WooCommerce."
Click Install Now and activate the plugin.
Once installed, you’ll need to configure the plugin settings. Access the Afterpay settings under WooCommerce > Settings > Payments. Here, you’ll need to enter your Afterpay merchant credentials. Make sure you have the following information ready:
| Credential | Details |
|---|---|
| Merchant ID | Your unique Afterpay merchant identifier. |
| API Key | Your Afterpay API access key. |
| Secret Key | Your Afterpay secret access key. |
With your credentials in place, you can customize how Afterpay appears at checkout. Consider enabling options such as promotional banners to inform customers about Afterpay’s services. This will not only enhance customer engagement but also potentially increase your sales conversions. Remember to test the setup in a staging environment before going live to ensure everything works smoothly!
Step-by-Step Guide to Installing the Afterpay Plugin
Installing the Afterpay plugin on your WooCommerce store can significantly enhance your customers’ shopping experience by offering flexible payment options. Let’s dive into the process step-by-step to get your Afterpay plugin up and running quickly.
First, you need to access your WordPress dashboard. Once logged in, navigate to Plugins > Add New. In the search bar, type Afterpay to find the official Afterpay plugin. It’s crucial to select the right one to ensure compatibility with your WooCommerce setup.
Once you’ve located the Afterpay plugin, click on the Install Now button. After installation, the button will change to Activate. Click it to enable the plugin on your site. You should now see an Afterpay menu item under the WooCommerce settings.
Next, you’ll need to configure the Afterpay plugin. Go to WooCommerce > Settings > Payments. Look for Afterpay in the list of payment options. Click on it to open the settings page, where you’ll enter necessary information such as your Afterpay Merchant ID and any other required credentials.
After filling in your details, make sure to save the changes. It’s also advisable to test the payment system to ensure everything is working correctly. Use the Afterpay Sandbox environment to conduct test transactions without affecting your live store.
If you encounter any issues, refer to the Afterpay documentation or support resources for troubleshooting tips. With everything set up, you’re ready to offer your customers the convenience of Afterpay and watch your sales grow!
Configuring Afterpay Settings for Optimal Performance
To truly harness the power of Afterpay in your WooCommerce store, it’s essential to configure your settings correctly. Proper configuration not only enhances user experience but also optimizes conversion rates, ensuring your customers have a seamless checkout process.
Start by navigating to the Afterpay settings within your WooCommerce dashboard. Here are some key settings to consider:
- Payment Methods: Ensure Afterpay is enabled as a payment method. This allows customers to choose Afterpay at checkout, increasing their likelihood of completing the purchase.
- Minimum Purchase Amount: Set a minimum purchase value that aligns with your average order size. This can help you avoid processing small transactions that may not be worthwhile.
- Order Limit: Configure the maximum order limit for Afterpay transactions. This helps mitigate the risk of high-value transactions that could impact your cash flow.
Next, consider the checkout experience. To do this effectively:
- Checkout Button Customization: Customize the Afterpay button to match your store’s theme, making it more visually appealing and recognizable to your customers.
- Clear Messaging: Use clear and concise messaging about how Afterpay works. Include information about the benefits, such as no interest and flexible payment options, to encourage its use.
Lastly, utilize analytics to monitor Afterpay’s performance. Track metrics such as:
| Metric | Description |
|---|---|
| Conversion Rate | Measure how many customers are choosing Afterpay over other payment methods. |
| Average Order Value | Analyze if Afterpay users are spending more compared to non-Afterpay users. |
| Refund Rate | Keep track of how many Afterpay transactions are returned to gauge customer satisfaction. |
By refining these settings and continually analyzing performance, you can ensure that Afterpay not only enhances your customer experience but also contributes positively to your bottom line.
Testing Your Afterpay Integration Before Going Live
Before you launch your WooCommerce store with Afterpay, it’s crucial to ensure everything functions seamlessly. Testing your integration will help you catch any potential issues that might affect user experience or transaction processing. Here are some key steps to follow:
- Set Up a Staging Environment: Create a duplicate of your live site to run tests without affecting real customers. This allows you to experiment freely.
- Use Test Mode: Activate Afterpay’s test mode within your WooCommerce settings. This enables you to simulate transactions without real money being exchanged.
- Conduct Sample Transactions: Process a series of test purchases using different payment methods. Be sure to try various scenarios, including cancellations and refunds.
- Verify User Experience: Walk through the checkout process as a customer would. Ensure that the Afterpay option is visible, easy to select, and functions smoothly.
- Check Email Notifications: Ensure that all confirmation emails and notifications are working correctly. This includes payment confirmations and any necessary follow-ups.
Moreover, keeping a close eye on your website’s performance during these tests is essential. It’s important to monitor loading times, responsiveness, and any potential conflicts with other plugins. A well-functioning site not only boosts customer confidence but also influences conversion rates.
To streamline your testing process, consider using the table below to track your findings:
| Test Scenario | Expected Outcome | Actual Outcome | Status |
|---|---|---|---|
| Test Payment with Afterpay | Transaction completes successfully. | Pending | Pass/Fail |
| Refund Process | Refund is processed and customer notified. | Pending | Pass/Fail |
| Email Confirmation | Customer receives email confirmation. | Pending | Pass/Fail |
Once you’ve completed these tests and addressed any issues, you’ll be well on your way to a successful Afterpay integration. A thorough testing phase not only ensures a smooth experience but also builds trust with your customers from day one.
Promoting Afterpay to Boost Sales and Customer Engagement
Integrating Afterpay into your WooCommerce store can be a game changer for your business. By offering customers the option to pay in installments, you not only enhance their shopping experience but also significantly increase your sales potential. Shoppers are more likely to make a purchase when they know they can spread their payments over time, making high-ticket items more accessible.
To get started, you’ll first want to ensure that your WooCommerce setup is ready for Afterpay. Here’s how you can seamlessly integrate it:
- Install the Afterpay Plugin: Head to the WooCommerce marketplace and download the Afterpay plugin. Follow the installation prompts to get it set up.
- Set Up Afterpay Account: If you haven’t already, sign up for an Afterpay merchant account. This is where you will manage your transactions and view analytics.
- Configure Settings: Within your WooCommerce settings, navigate to the Payments tab and enable Afterpay. Fill in the required fields with your Afterpay account details.
- Customize the Checkout Experience: Use the plugin settings to adjust how Afterpay appears at checkout, ensuring it aligns with your branding and provides a smooth user experience.
Once Afterpay is integrated, you’ll want to promote this feature to your customers. Highlighting it effectively can lead to increased engagement and conversions. Consider the following strategies:
- Promotional Banners: Create eye-catching banners on your homepage and product pages that emphasize “Buy Now, Pay Later with Afterpay.”
- Email Marketing: Send out a newsletter showcasing new arrivals and mention that customers can purchase them using Afterpay.
- Social Media Campaigns: Utilize platforms like Instagram and Facebook to run targeted ads that promote Afterpay, showcasing how easy it is to use.
- Incentives for First-Time Users: Consider offering a discount or free shipping for customers making their first purchase with Afterpay.
To further illustrate the impact of Afterpay, here’s a simple comparison of sales before and after integration:
| Time Period | Average Order Value | Conversion Rate |
|---|---|---|
| Before Afterpay | $75 | 2.2% |
| After Afterpay | $95 | 3.5% |
As you can see, the introduction of Afterpay has the potential to elevate both average order values and conversion rates. By making purchases easier and more manageable for your customers, you’ll create a shopping environment that encourages loyalty and repeat business. With Afterpay, you’re not just selling products; you’re building a community of satisfied shoppers who appreciate the flexibility and convenience you offer.

Troubleshooting Common Issues with Afterpay in WooCommerce
Implementing Afterpay in your WooCommerce store can elevate your customer experience, but sometimes things don’t go as smoothly as planned. Here are some common issues you may encounter, along with practical solutions to get you back on track!
Payment Gateway Configuration
First things first, ensure that your Afterpay payment gateway is properly configured:
- API Credentials: Double-check that your API credentials are accurately entered. A simple typo can prevent transactions from going through.
- Sandbox vs. Live Mode: Make sure you are in the correct mode. Testing in sandbox mode won’t process real payments, so switch to live mode when you’re ready.
- SSL Certificate: Your site must have a valid SSL certificate for Afterpay to function correctly. Check your site’s security settings!
Customer Experience Issues
Sometimes customers might face challenges during checkout. Here’s how to tackle those:
- Eligibility Checks: Ensure customers are aware that Afterpay’s eligibility checks might affect their ability to complete the purchase. Sometimes, it’s just a matter of meeting Afterpay’s criteria.
- Cart Limitations: Inform customers about any minimum or maximum cart value restrictions imposed by Afterpay.
- Browser Compatibility: Advise users to check their browser settings or try a different browser if they experience issues during checkout.
Debugging Transaction Failures
If transactions are failing, take these steps to troubleshoot:
- Error Logs: Review your WooCommerce error logs for any messages related to Afterpay transactions. This can provide insights into what went wrong.
- Plugin Conflicts: Temporarily disable other plugins to see if there’s a conflict affecting Afterpay. Sometimes, the issue may not be with Afterpay itself but with another plugin.
- Contact Support: When in doubt, reach out to Afterpay support. They can provide you with specific error codes and solutions based on your account.
Testing Payments
Before going live, it’s crucial to test the payment process:
| Test Scenario | Expected Outcome |
|---|---|
| Successful Payment with Valid Details | Transaction completes successfully. |
| Failed Payment Due to Low Credit | Customer receives an error message. |
| Invalid API Credentials | Error message prompts for correction. |
Measuring the Impact of Afterpay on Your Business Growth
Integrating Afterpay into your WooCommerce store can significantly enhance your business growth, but measuring its impact is crucial to understand how it’s contributing to your bottom line. First and foremost, you should keep an eye on your conversion rates. By offering flexible payment options, more customers may complete their purchases, especially those who might hesitate due to upfront costs. Track changes in conversion rates before and after implementing Afterpay to quantify its effectiveness.
Another important metric to consider is your average order value (AOV). Afterpay can encourage customers to spend more by allowing them to split payments into manageable amounts. You can calculate AOV by dividing the total revenue by the number of orders. Observing an increase in this figure after adding Afterpay could indicate that customers are feeling more confident in their purchasing decisions.
Additionally, don’t overlook the customer retention rate. Offering Afterpay might attract new customers, but keeping them is just as important. You can measure this by tracking repeat purchases from customers who used Afterpay. This insight will help you evaluate whether the flexibility of payment options creates a loyal customer base.
| Metric | Before Afterpay | After Afterpay |
|---|---|---|
| Conversion Rate | 2.5% | 4.0% |
| Average Order Value | $70 | $90 |
| Customer Retention Rate | 45% | 60% |
Lastly, consider analyzing customer feedback and surveys. Gathering insights from your customers about their payment preferences can provide valuable qualitative data. Ask them how the availability of Afterpay influenced their buying decisions. This can help you assess not only the quantitative metrics but also the sentiment behind those numbers.
Frequently Asked Questions (FAQ)
Q&A: How to Add Afterpay to WooCommerce
Q1: What is Afterpay, and why should I consider adding it to my WooCommerce store?
A: Afterpay is a buy now, pay later service that allows customers to split their purchases into four interest-free payments, making it easier for them to shop without the burden of upfront costs. Adding Afterpay to your WooCommerce store can boost your sales by making it more accessible for customers to purchase your products. It improves conversion rates, reduces cart abandonment, and appeals to a broader customer base, especially younger shoppers who appreciate flexible payment options.
Q2: Is it easy to integrate Afterpay with WooCommerce?
A: Absolutely! Integrating Afterpay with WooCommerce is a straightforward process. With a few simple steps, you can have it up and running in no time. Whether you’re a seasoned pro or a WooCommerce newbie, you’ll find that the setup is user-friendly and well-supported by both WooCommerce and Afterpay.
Q3: What do I need to get started with Afterpay on my WooCommerce store?
A: To get started, you’ll need a WooCommerce store, an Afterpay merchant account, and the Afterpay WooCommerce plugin. Make sure your store meets Afterpay’s eligibility criteria, which typically includes having a certain level of sales volume and a valid business license. Once you have these, you’re ready to proceed!
Q4: Can you walk me through the steps to add Afterpay to WooCommerce?
A: Of course! Here’s a quick rundown of the steps:
- Sign Up for Afterpay: Create a merchant account with Afterpay and get your merchant credentials.
- Install the Afterpay Plugin: Go to your WooCommerce dashboard, navigate to Plugins, and search for the Afterpay plugin. Install and activate it.
- Configure Settings: Enter your Afterpay merchant credentials in the plugin settings and customize any display options according to your brand.
- Test Payment: It’s always a good idea to run a test transaction to ensure everything is functioning correctly.
- Go Live: Once you’re satisfied with the setup, you can start accepting Afterpay as a payment option!
Q5: Will adding Afterpay affect my existing payment methods?
A: Not at all! Afterpay works seamlessly with your existing payment methods. Customers can choose Afterpay at checkout without disrupting their payment experience. This flexibility can actually enhance your checkout process and make your store more appealing.
Q6: Are there any fees associated with using Afterpay?
A: Yes, like most payment processors, Afterpay does charge a fee for each transaction. However, the potential increase in sales and customer satisfaction often outweighs these fees. It’s a small price to pay for boosting your revenue and attracting new customers!
Q7: How do I promote Afterpay to my customers?
A: Promotion is key! Make sure to highlight Afterpay on your product pages, in your marketing emails, and through social media. Use eye-catching banners or badges that say “Buy Now, Pay Later with Afterpay” to grab attention. Educate your customers about the benefits, like flexibility and interest-free payments, so they see the value in choosing Afterpay.
Q8: Can Afterpay help me reach a wider audience?
A: Definitely! Many consumers prefer stores that offer flexible payment options. By providing Afterpay, you appeal to a demographic that may not have the funds to spend upfront but still wants to shop. This can significantly widen your customer base and enhance customer loyalty.
Q9: What if I encounter issues while integrating Afterpay?
A: If you run into any snags, don’t worry! Afterpay has a robust support system, and WooCommerce has a wealth of resources available. You can find helpful documentation or reach out to their support teams for assistance. You’re not alone in this!
Q10: Is Afterpay a long-term solution for my WooCommerce store?
A: Absolutely! The popularity of buy now, pay later services is on the rise, and customers are increasingly expecting these options when they shop. Integrating Afterpay not only meets that demand but can also position your store for long-term success, customer retention, and higher revenue.
Ready to take your WooCommerce store to the next level? Adding Afterpay is a smart move that can enhance customer experience, increase your sales, and set you apart in a competitive market. What are you waiting for? Start your integration today!
Final Thoughts
And there you have it! Adding Afterpay to your WooCommerce store isn’t just a technical tweak; it’s a game-changer for your business. By offering flexible payment options, you’re not only making it easier for customers to say “yes” to their favorite products but also boosting your sales potential.
Imagine the thrill of seeing your customers check out with a smile, knowing they can enjoy their purchases today while paying over time. It’s a win-win! So why wait? Dive into the integration, give your customers the shopping experience they crave, and watch as your conversion rates soar.
If you have any questions or need further assistance, don’t hesitate to reach out. Happy selling!


