Are you ready to take your WooCommerce store to the next level? If you’re just starting out, you might be wondering how to streamline your shipping process and make it easier for your customers to understand their options. Enter shipping classes! These handy features can transform the way you manage shipping costs, allowing you to tailor rates based on the unique needs of your products. Whether you’re selling bulky items, small accessories, or anything in between, learning how to use shipping classes can save you time, reduce confusion, and enhance the overall shopping experience for your customers. In this guide, we’ll walk you through the ins and outs of shipping classes in WooCommerce, providing you with all the essential tips and tricks you need to get started. So, let’s dive in and unlock the potential of your online store!
Understanding Shipping Classes and Their Importance in WooCommerce
Shipping classes in WooCommerce are essential for managing shipping options efficiently, making them a crucial aspect of your e-commerce strategy. By categorizing products into different shipping classes, you can tailor shipping rates based on various factors such as size, weight, or type of product. This not only enhances the shopping experience for your customers but also helps you maintain control over your shipping costs.
One of the primary benefits of using shipping classes is the ability to set specific shipping rates for different groups of products. For instance, you might want to charge a higher rate for bulky items while offering a flat rate for smaller products. This flexibility allows you to create a more personalized shopping experience and can ultimately lead to increased customer satisfaction. Here are some common scenarios where shipping classes prove beneficial:
- Variable weight items: Different shipping rates for items that vary significantly in weight.
- Fragile products: Higher shipping rates for delicate items requiring special handling.
- Large items: Distinct rates for oversized goods that demand additional shipping resources.
Moreover, shipping classes can streamline your shipping process by allowing you to group products logically. When you define classes for your products, it becomes easier to apply bulk shipping rules and manage shipping methods in one fell swoop. This is particularly beneficial for stores with a large inventory. Imagine the time saved when setting rules for a specific shipping class rather than adjusting individual product settings!
To set up shipping classes in WooCommerce, you’ll need to navigate to the WooCommerce settings under the ‘Shipping’ tab. From there, you can create custom shipping classes and assign products to them. Here’s a simple overview of how to do it:
| Step | Description |
|---|---|
| 1 | Go to WooCommerce > Settings > Shipping. |
| 2 | Select the shipping zone you want to modify. |
| 3 | Click on ‘Shipping Classes’ and add your desired classes. |
| 4 | Assign products to those classes in their individual settings. |
By mastering the use of shipping classes in WooCommerce, you’re not only improving your operational efficiency but also enhancing your customers’ experience. This attention to detail can set your store apart in a competitive market, making it easier to build a loyal customer base. So, take the time to assess your product offerings and implement shipping classes that make sense for your business! Your bottom line will thank you.
Setting Up Your First Shipping Class: A Step-by-Step Guide
Creating your first shipping class in WooCommerce is an exciting step toward tailoring your online store’s shipping options to better fit your business needs. Follow this simple guide to set up your shipping class quickly and effectively.
First, navigate to your WooCommerce settings by going to WooCommerce → Settings in your WordPress dashboard. From there, select the Shipping tab. You’ll notice a section labeled Shipping Classes. This is where the magic happens! Click on Add Shipping Class to begin creating your first class.
When adding a new shipping class, you’ll need to fill in a few details:
- Shipping Class Name: This is how you’ll identify your class. Make it descriptive, like “Heavy Items” or “Express Shipping.”
- Shipping Class Slug: This is essentially the URL-friendly version of your class name—keep it short and avoid spaces.
- Description: Provide a brief explanation of the class. This is optional but can help you remember the purpose of the class later.
Once you’ve entered the necessary information, click on Save Changes to create your shipping class. Congratulations! You’ve set up the framework for your shipping options. Now, it’s time to assign this shipping class to your products. Navigate to the Products section, select a product, and scroll down to the Product Data panel. Under the Shipping tab, you’ll see a dropdown menu labeled Shipping Class. Just select the class you created earlier and save the product.
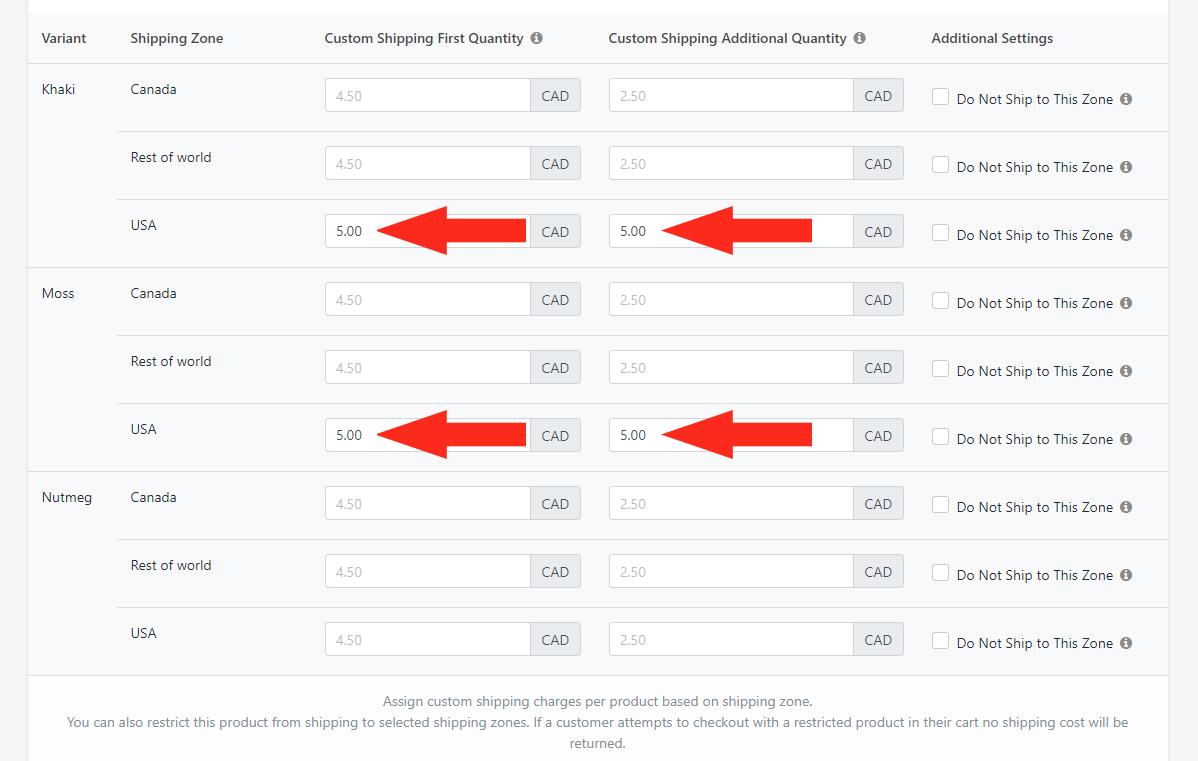
To make your shipping options even more flexible, you can set different rates for each shipping class. Go back to the Shipping Zones section under the Shipping tab. Here, you can either add a new zone or edit an existing one. When configuring your shipping methods, select the shipping class you want to set a rate for, and enter the corresponding price. This allows you to charge different amounts based on the class assigned to the products!

Assigning Shipping Classes to Your Products for Better Organization
Organizing your products with shipping classes in WooCommerce can not only streamline your shipping process but also enhance your customers’ shopping experience. By categorizing products into different shipping classes, you can apply specific shipping rates and rules that are tailored to each group, ensuring that your customers are charged accurately based on the items they are purchasing.
To get started, you’ll first need to define your shipping classes. Consider factors such as:
- Product Weight: Heavier items may require different shipping rates compared to lighter ones.
- Dimensions: Bulky items could incur additional handling fees.
- Type of Product: Special items like perishables or fragile goods often need unique shipping setups.
Once you’ve identified your shipping classes, head over to your WooCommerce settings. Navigate to WooCommerce > Settings > Shipping and select the Shipping Classes tab. Here, you can create new classes by clicking on the “Add Shipping Class” button and assigning a name and description that reflects the category. For instance, you might have classes named “Standard Shipping,” “Express Delivery,” or “Fragile Items.”
After creating your classes, the next step is to assign them to your products. Go to the product edit page and locate the Shipping tab. From the dropdown menu, select the appropriate shipping class for each product. This ensures that when customers check out, the shipping calculations will reflect the specified class, helping you manage costs effectively.
| Shipping Class | Description | Example Products |
|---|---|---|
| Standard Shipping | For regular items with no special handling | T-shirts, Books |
| Express Delivery | Fast shipping for urgent orders | Electronics, Gifts |
| Fragile Items | Special care required during shipping | Glassware, Artwork |
By implementing shipping classes, you’ll find that your logistics become more efficient. This not only saves you time in the long run but also minimizes errors in shipping costs. Plus, it conveys professionalism and attention to detail to your customers, enhancing their trust in your business. Make the most of WooCommerce’s capabilities to provide a seamless shopping experience!

How Shipping Classes Can Help You Optimize Shipping Costs
Shipping classes in WooCommerce serve as an invaluable tool for streamlining your shipping strategy and maximizing cost efficiency. By categorizing your products into different shipping classes, you can tailor shipping rates based on the type of items customers are purchasing. This means you can charge appropriately for heavier or bulkier items while offering competitive rates for lighter products.
Using shipping classes, you can:
- Reduce Cart Abandonment: By clearly defining shipping costs for each class, customers can see the total costs upfront, minimizing surprises at checkout that often lead to cart abandonment.
- Enhance Customer Satisfaction: Offering transparent and reasonable shipping rates can significantly improve customer trust and satisfaction, encouraging repeat purchases.
- Optimize Profit Margins: With the right shipping classes, you can ensure that you aren’t undercharging for heavy items or overcharging for lighter products. This balance helps maintain healthy profit margins.
To set up shipping classes in WooCommerce, follow these steps:
- Navigate to WooCommerce > Settings > Shipping.
- Under the Shipping Classes tab, you can add new classes and assign products to them based on their characteristics.
- Configure shipping zones and methods for each class, ensuring your shipping rates reflect the needs of your customers.
Here’s a simple table that illustrates how different shipping classes can impact shipping costs:
| Shipping Class | Example Product | Shipping Cost |
|---|---|---|
| Standard | T-shirt | $5.00 |
| Heavy | Outdoor Grill | $25.00 |
| Fragile | Glass Vase | $15.00 |
By meticulously setting your shipping classes, you not only improve operational efficiency but also create a seamless shopping experience for your customers. Take the time to analyze your products and their respective shipping needs, and you’ll find that the right shipping strategies can lead to increased sales and satisfied customers.

Customizing Shipping Rates Based on Classes: Tips and Tricks
Customizing shipping rates based on classes in WooCommerce can greatly enhance your online store’s efficiency and customer satisfaction. By categorizing products into classes, you can apply specific shipping rules that reflect their unique characteristics. This not only simplifies your shipping process but also allows you to offer more tailored shipping options to your customers.
Here are some tips and tricks to effectively customize shipping rates:
- Define Clear Shipping Classes: Start by establishing clear shipping classes for your products. Consider factors like weight, dimensions, and type of product. For instance, you might have classes for heavy items, fragile goods, or standard products.
- Utilize WooCommerce Settings: Navigate to WooCommerce > Settings > Shipping, and create shipping zones. Assign your predefined shipping classes to these zones to provide accurate rates based on the customer’s location.
- Set Rates Intelligently: Use either flat rate pricing or calculated rates based on the shipping class. For example, you might charge a higher flat rate for heavy items and a lower rate for small packages, ensuring customers see the value in what they’re paying for.
Moreover, leveraging shipping plugins can offer additional flexibility:
- Dynamic Pricing: Some plugins allow you to set dynamic shipping rates based on the cart contents, ensuring that customers only pay for what they need.
- Free Shipping Options: Consider implementing free shipping for specific classes or order values, which can entice customers to increase their cart size.
To give you a clearer picture, here’s a simple table demonstrating how shipping rates can vary based on product classes:
| Shipping Class | Flat Rate | Free Shipping Threshold |
|---|---|---|
| Standard Products | $5.00 | $50.00 |
| Heavy Items | $15.00 | $150.00 |
| Fragile Goods | $10.00 | $75.00 |
By implementing these strategies, you’ll not only simplify your shipping process but also enhance customer experience. Customers appreciate transparency and fairness in shipping costs, and by customizing your rates effectively, you’ll be putting your best foot forward in the competitive e-commerce landscape.
Troubleshooting Common Issues with Shipping Classes in WooCommerce
When using shipping classes in WooCommerce, you may encounter a few common issues that can complicate the shipping process. Understanding these challenges and their solutions can make managing your online store much smoother. Here are some typical problems and how to troubleshoot them:
- Shipping Class Not Applying: Sometimes, you may notice that a shipping class is not applying as expected. This could be due to incorrect assignment of the shipping class to products. Ensure that you have properly assigned the correct shipping class in the product settings.
- Conflicting Shipping Zones: Another issue may arise if you have set up multiple shipping zones. If a product’s shipping class doesn’t match any shipping zone configuration, it may lead to unexpected shipping rates. Review the shipping zones and ensure that each zone has the appropriate shipping methods configured for the classes used.
- Incorrect Rates Displayed: If the shipping rates displayed are not what you expect, it could be due to misconfiguration in the shipping class settings. Double-check that the rates associated with each shipping class are correctly set up in WooCommerce under the shipping settings.
To help visualize the shipping classes and their associated rates, consider using a simple table format:
| Shipping Class | Shipping Rate | Zone |
|---|---|---|
| Standard | $5.00 | United States |
| Express | $15.00 | United States |
| International | $25.00 | Worldwide |
Lastly, if customers are experiencing issues during checkout, it’s essential to check for any caching plugins that may be interfering with real-time rate calculations. Clearing the cache can often resolve unexpected behavior in the checkout process.

Enhancing Customer Experience with Accurate Shipping Options
In today’s fast-paced e-commerce landscape, providing customers with accurate shipping options is more crucial than ever. When shoppers feel confident about how and when their products will arrive, they’re more likely to complete their purchases. Utilizing shipping classes in WooCommerce allows you to tailor your shipping experience, making it not only easy to understand but also highly efficient.
With WooCommerce, you can create custom shipping classes to categorize your products based on various criteria such as weight, size, or shipping priority. This allows you to offer multiple shipping options that cater to different customer needs, enhancing their overall shopping experience. Here are some benefits of using shipping classes:
- Increased Clarity: Customers can easily see the available shipping options for each product.
- Cost Efficiency: Different products can have tailored shipping rates that reflect their actual shipping costs.
- Flexibility: You can offer expedited shipping, standard shipping, or even free shipping based on specific classes.
To get started, you can navigate to the WooCommerce settings in your WordPress dashboard. Create your shipping classes by defining the attributes that best fit your inventory. For example, if you sell both lightweight apparel and heavy furniture, you can set up classes like “Standard Shipping” for clothing and “Heavy Items” for furniture. This differentiation ensures that your customers receive precise shipping costs and delivery times right at checkout.
| Shipping Class | Example Products | Shipping Method |
|---|---|---|
| Standard Shipping | T-shirts, Hats | Flat Rate |
| Heavy Items | Sofas, Beds | Freight Shipping |
| Express Shipping | Electronics, Cosmetics | Next-Day Delivery |
Another key aspect is keeping your customers in the loop. Once they’ve selected their preferred shipping option, consider integrating tracking features that allow them to monitor their orders. This not only builds trust but also provides a sense of control over their purchase. By focusing on accurate shipping options and clear communication, you can significantly boost customer satisfaction and encourage repeat business.
Best Practices for Managing Multiple Shipping Classes Effectively
When managing multiple shipping classes in WooCommerce, organization is key. Begin by clearly defining your shipping classes based on factors like weight, dimensions, and destination. This will help you categorize products more efficiently and provide accurate shipping rates to your customers. Consider using descriptive names for each class, making it easier for you and your team to identify them later.
Next, take advantage of the bulk editing feature in WooCommerce. If you have a large number of products, applying shipping classes in bulk can save you a lot of time. Simply navigate to the Products section, filter the products you want, and use the bulk actions dropdown to apply the desired shipping class. This ensures consistency across your product offerings.
Additionally, regularly review your shipping classes to ensure they align with your current business model and shipping rates. It’s easy to overlook outdated classes, which can lead to confusion during the checkout process. Set a reminder to audit your shipping classes every few months; this will help you keep your shipping strategy fresh and relevant.
Utilizing a shipping cost table can also enhance transparency for your customers. By displaying shipping costs associated with each class, you can minimize cart abandonment rates. Here’s a simple way to structure that information:
| Shipping Class | Cost | Delivery Time |
|---|---|---|
| Standard Shipping | $5.00 | 3-5 Business Days |
| Express Shipping | $15.00 | 1-2 Business Days |
| International Shipping | $25.00 | 5-10 Business Days |
keep your customers informed by integrating shipping class information into your product pages. Use plugins to display estimated shipping costs based on the class selected. This not only enhances the user experience but also builds trust, as customers appreciate knowing what to expect up front. Remember, effective management of shipping classes can significantly improve your overall logistics and customer satisfaction.

Integrating Shipping Classes with Other WooCommerce Features
Integrating shipping classes with WooCommerce features can streamline your e-commerce operations and enhance the shopping experience for your customers. By leveraging these features, you can provide tailored shipping options that suit various product types or customer needs. Here’s how you can make the most out of shipping classes.
First off, consider using shipping classes in conjunction with product categories. This integration allows you to assign specific shipping rates to products based on their category. For instance, if you sell both lightweight items and bulky furniture, you can create shipping classes that reflect these differences. Customers will appreciate the clarity and accuracy of shipping costs at checkout, which can significantly reduce cart abandonment rates.
Another powerful combination is shipping classes with discount coupons. By creating specific shipping classes for promotional products, you can offer free or discounted shipping options that entice customers. Set up a coupon that applies only to items with a certain shipping class, encouraging users to explore more products within that class. This not only boosts sales but also fosters customer loyalty.
Furthermore, integrating shipping classes with inventory management tools can help you keep track of stock levels and shipping costs in real-time. By doing so, you can ensure that the shipping charges accurately reflect the available inventory. For example, if you have a limited quantity of a certain product, you can adjust its shipping class to reflect expedited shipping, which may be necessary for quicker delivery.
Here’s a simple table to illustrate how different shipping classes can be set up with specific features:
| Shipping Class | Product Type | Shipping Rate |
|---|---|---|
| Standard | Small Items | $5.00 |
| Heavy | Furniture | $20.00 |
| Free Shipping | Promotional Items | $0.00 |
don’t overlook the potential of combining shipping classes with shipping zones. This allows you to set different rates based on geographical areas for specific shipping classes. For example, you might charge different rates for bulky items depending on whether they are shipped locally or internationally. Having this flexibility not only saves you money but also keeps your customers satisfied with transparent pricing.
Frequently Asked Questions (FAQ)
Q&A: How to Use Shipping Classes in WooCommerce: For Beginners
Q1: What are shipping classes in WooCommerce, and why should I care about them?
A1: Great question! Shipping classes in WooCommerce allow you to group your products based on shipping rates. Think of them as categories for shipping. Using shipping classes helps you create more accurate shipping costs tailored to different types of products. If you’re selling heavy items, fragile goods, or even digital products, using shipping classes can help you minimize costs and enhance customer satisfaction. Who wouldn’t want that?
Q2: How do I set up shipping classes in WooCommerce?
A2: Setting up shipping classes is super simple! Just head over to your WooCommerce dashboard, click on ‘Settings,’ and then find the ‘Shipping’ tab. From there, you’ll see an option for ‘Shipping Classes.’ You can add new classes by giving them a name and a slug. For example, you could create classes like “Heavy,” “Fragile,” or “Free Shipping.” It’s an easy way to ensure that your shipping rates reflect the nature of your products!
Q3: Can I assign shipping classes to individual products?
A3: Absolutely! Once you have your shipping classes set up, you can assign them to products individually. Just go to the product edit page, scroll down to the ‘Product Data’ section, and select the appropriate shipping class from the dropdown menu. This allows you to tailor shipping costs per product, which is perfect for keeping your customers happy without overcharging them.
Q4: What if I have products that should share a shipping class?
A4: No problem! You can assign multiple products to the same shipping class, which is fantastic for items that share similar shipping characteristics. For instance, if you have a line of delicate glassware, you can assign them all to a “Fragile” shipping class. This way, you can set one shipping rate for all those products, making life easier for you and your customers!
Q5: How do I set shipping rates for different classes?
A5: To set shipping rates for each class, go back to the ‘Shipping’ tab under WooCommerce settings and click on the relevant shipping zone. You’ll see options to add various shipping methods like flat rate, free shipping, or local pickup. When you choose flat rate, you can specify the cost for each shipping class you’ve set up. This means you can charge different rates depending on the shipping class, ensuring you’re not undercharging for heavier items!
Q6: Can I offer free shipping using shipping classes?
A6: Definitely! Free shipping can be a fantastic incentive for your customers. You can set up a shipping class specifically for free shipping and apply it to certain products or categories. Then, when setting up your shipping methods, you can define conditions for when free shipping is available—like for orders over a certain amount or for specific products. It’s a great way to boost sales!
Q7: What are some common mistakes to avoid when using shipping classes?
A7: One common mistake is overlooking the importance of testing your shipping rates before going live. It’s essential to ensure that they accurately reflect your costs. Another mistake is not regularly updating your shipping classes as your product range evolves. As you add new products, take a moment to review and adjust your shipping classes and rates accordingly. Staying on top of this can save you money and enhance customer experience!
Q8: Any tips for beginners just getting started with shipping classes?
A8: Absolutely! Start small. Create a few shipping classes based on the most common types of products you sell. As you become more comfortable, you can refine your classes and rates. Don’t hesitate to use WooCommerce’s built-in shipping calculator, and encourage feedback from your customers. It’s a learning process, and your goal is to create an efficient system that benefits everyone involved. Plus, your customers will appreciate the clarity and accuracy!
So, are you ready to dive into shipping classes in WooCommerce? With just a little effort, you can make a big difference in your shipping strategy and customer satisfaction!
Wrapping Up
And there you have it! By now, you should feel equipped to tackle shipping classes in WooCommerce like a pro. Remember, successful online selling isn’t just about the products you offer; it’s also about how you deliver them. By implementing shipping classes, you can provide your customers with a seamless and tailored shopping experience that not only meets their needs but also enhances your store’s credibility.
Don’t shy away from experimenting with different shipping strategies—after all, each business is unique, and finding the right approach can lead to increased customer satisfaction and potentially higher sales. So, roll up your sleeves, dive into those settings, and start customizing your shipping options today!
If you found this guide helpful, share it with your fellow entrepreneurs or leave a comment below. We’d love to hear about your experiences or any tips you might have for using shipping classes effectively. Happy selling!

